How to setup a home lab to practice Ansible
Hi guys, how are you?
It has been a while since I wrote here, but I’m not dead!
Today, I’m here to show you how to setup a simple home lab to practice your Ansible skills. Of course, you can use it for anything, feel free to use it anyway you want.
—
First of all: Install Vagrant
You can go to their website and download the version you want, but there are a prerequisite in order to this work. You must install a virtualizartion tool. I recommend VirtualBox. It’s simple, it’s easier to setup. Go ahead and download them both. VirtualBox can be found here.
—
Now that everything is installed, let’s jump into Vagrant.
Create a directory that’s going to be for you project
mkdir MyProject
cd MyProject
Now, create a Vagrantfile. A Vagrantfile is a way to tell vagrant how you want your machines down to the minimal level. You can choose their IP, RAM, CPU whatever you like! It’s like a recipe for you machines.
I’m going to show you how mine looks like:
In this file I’ve create a vector of servers, you can add as much as you want. In each element of the vector, you can specify what image will your virtual machine host. I’ve setup the IP address, so I can SSH into it, as well a custom port.
In this example, I used a simple web application tier. With 2 webservers, a loadbalancer, a database and a queue. And most important, the control machine, in which we will install Ansible.
Now that you understood what a Vagrantfile can do, let’s create our machines!
Go into the directory of your Vagrantfile and run:
vagrant upIf you want to terminate your machines:
vagrant destroyIf you want to run only one of them:
vagrant up databaseBased on the hostname of the machine!
—
Now you need to create your keys to SSH into the machines.
I know that you can ssh using Vagrant. But this is not cool.
—
Download PuttyGen, it can be found here. After you done this, open it and let’s create a key pair.
By default, Vagrant creates a hidden directory in your home directory:
cd ~/.vagrant.dIn this folder, there is a file called insecure_private_key.
Open the PuttyGen, and click in Load


Select the file that we mentioned and open it.
Now, click in Save private key. You don’t need a passphrase.
After you have done this, open Putty, and SSH into
127.0.0.1:[customport][customport] is what we defined in the Vagrantfile.
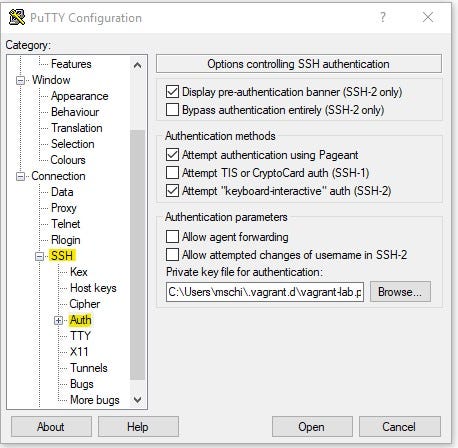
But first, go to SSH, then Auth and select the .ppk file created with the PuttyGen
If you want to do the same with WinSCP, go into Advanced, click in SSH then Auth:

Select the .ppk file and you are good to go!
—
Now that we can connect into our machines. SSH into the control machine and let’s install Ansible.
ssh vagrant@127.0.0.1:[customport][customport] being the port that we set for the control machine.
Once we are inside the machine:
sudo yum install ansible -yTo install Ansible.
—
In order to connect to other machines, Ansible needs a key.
In the Vagrant file we created one, its called id_rsa and its located in
~/.sshGo to that directory and bring it to the control machine. You can use WinSCP, if you are on Windows.
Now move it to the .ssh folder with the correct permissions:
chmod 700 id_rsa
mv id_rsa .ssh/
Now, you must configure you Ansible Inventory. I have an example here:
Create a file like this and move it to the Ansible hosts:
sudo mv hosts /etc/ansible/hostsNow, run a quick test:
ansible -m ping allYou will get a ping pong!